|
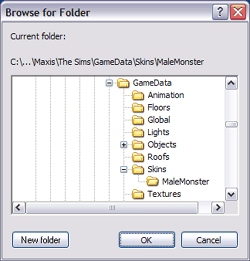
Now we will extract the files to a new sub-folder in the skins folder.
1: First Click the Extract button next to the Mesh. This will be the
top Extract button. You will then see the Browse For Folder dialog. If you
look down the list you will see it defaults to the game skins folder.
 2: Now click
the New Folder button so we can add a sub-folder to the game skins folder.
(Make sure the game skins folder is selected before doing this unless you
intend to put the skins in a different place) Sub-folders in the skins folder
will be ignored by the game which is why we are placing them here. If you
want to later edit these as default replacements for the NPC you can put
them right in the skins folder later. 2: Now click
the New Folder button so we can add a sub-folder to the game skins folder.
(Make sure the game skins folder is selected before doing this unless you
intend to put the skins in a different place) Sub-folders in the skins folder
will be ignored by the game which is why we are placing them here. If you
want to later edit these as default replacements for the NPC you can put
them right in the skins folder later.
 3: Type
MaleMonster in the box and then click OK. 3: Type
MaleMonster in the box and then click OK.
 4: You will
now see a new folder added under skins in the dialog. Click OK and the files
will begin extracting. 4: You will
now see a new folder added under skins in the dialog. Click OK and the files
will begin extracting.
5: Click OK for each file it extracts. In this case there will be two
files. a skn and a bmp. When it is extracting it will get any skn listed
in the character cmx and any bmp listed in the skn files. If there were
more skn files in the cmx then it would get 2 more files for each one.
6: Now click the Extract button next to the Texture. This will be the
second Extract button.
7. Check to make sure the MaleMonster folder is still selected and click
OK.
8: Click OK when it lists the file as being extracted.
Note: We actually could have skipped 7 and 8 above since the texture
was already listed as the default in the skn file and was extracted in when
we used the first extract button. In some cases there may be a different
default bmp file listed in the skn file though so we did this just to be
sure we have the texture we see in the list.
We now have all of the body files extracted for this NPC.
Click Next Below and we will extract the Head files.
|